


There is something undeniably magical about cutting into a Red Velvet Cake. That flash of vibrant red against the stark white cream cheese frosting is a showstopper every single time.
But I’ll be honest with you—I used to think red velvet was just “chocolate cake with food coloring.” I was so wrong.
My quest for the best red velvet cake recipe started years ago when I tasted a slice that was dry and flavorless. I knew there had to be a better way. After dozens of tests in my kitchen, avoiding the dreaded “dry crumb” disaster, I finally cracked the code. This recipe strikes the perfect balance: it has that signature mild chocolate tang, a buttery vanilla undertone, and a texture so moist it practically melts in your mouth.
If you’ve been hunting for a homemade red velvet cake that tastes even better than it looks, you have arrived. This is the only recipe you will ever need.
(Link to Innovationrecipes.com: Discover more creative dessert ideas to pair with this cake!)
What is Red Velvet Cake, Actually?
A lot of people ask me, “What flavor is red velvet?” It’s a valid question! It’s not quite vanilla, and it’s definitely not a rich chocolate cake.
A true classic red velvet cake is its own distinct flavor category. It features a subtle cocoa taste—just enough to give it depth without overpowering the vanilla—and a specific tanginess that comes from buttermilk and vinegar.
Historically, the reaction between acidic buttermilk and raw cocoa powder would reveal the red anthocyanin in the cocoa, giving the cake a reddish hue. Today, we boost that color to get the iconic bright red we all love, but the science behind the flavor remains the same.
Learn more about the fascinating history of velvet cakes from Smithsonian Magazine.
Why This Recipe Works (The Science of Moisture)
You might be wondering, “Why is this specific recipe so much better?” It comes down to the chemistry of the ingredients.
- The Acid Factor: The combination of buttermilk and white vinegar does two things. First, it tenderizes the gluten in the flour, making the crumb super soft. Second, it reacts with the baking soda to create carbon dioxide bubbles, giving the cake a fluffy lift.
- Oil + Butter: I never choose just one. Butter gives this moist red velvet cake its delicious flavor, while the oil ensures it stays soft for days. Recipes that use only butter can dry out in the fridge, but this blend keeps it perfect.
- Natural Cocoa Powder: I always use standard unsweetened cocoa powder, not Dutch-processed. The natural acids in the cocoa are needed to react with the baking soda!
Read about the chemistry of baking acids to understand why we use vinegar!
Ingredients for Red Velvet Cake
To make this easy red velvet cake, you don’t need fancy equipment, just standard pantry staples.
Dry Ingredients
- All-Purpose Flour: 2 ½ cups (300g), sifted to ensure a light crumb.
- Sugar: 1 ½ cups (300g) granulated sugar.
- Cocoa Powder: 2 tablespoons unsweetened natural cocoa powder.
- Baking Soda: 1 teaspoon (check the expiration date!).
- Salt: 1 teaspoon to balance the sweet.
Wet Ingredients
- Butter: ½ cup (113g) unsalted, room temperature.
- Vegetable Oil: A splash (about ¼ cup) helps lock in moisture. (Optional context: pure oil works best). Note: The base recipe allows swapping some butter for oil.
- Eggs: 2 large eggs, room temperature.
- Buttermilk: 1 cup (240ml). If you don’t have it, make a substitute with milk and lemon juice!
- Vinegar: 1 tablespoon distilled white vinegar.
- Vanilla Extract: 2 teaspoons pure vanilla.
- Red Food Coloring: 1-2 tablespoons liquid dye or 1 teaspoon gel paste for that vibrant look.
The Cream Cheese Frosting
- Cream Cheese: 16 oz (two blocks), full fat, softened.
- Butter: ½ cup (1 stick), softened.
- Powdered Sugar: 4 cups, sifted.
- Vanilla: 1 teaspoon.
Check out our guide to perfect frostings for more tips!
Step-by-Step Instructions
Ready to bake? Preheat your oven to 350°F (175°C) and grease two 8-inch cake pans.
1. Whisk the Dry Goods
In a medium bowl, sift together the flour, cocoa powder, baking soda, and salt. Sifting is crucial here—nobody wants a lump of cocoa in their slice!
2. Cream the Butter
In a large bowl (or stand mixer), beat the softened butter and sugar on medium-high speed for about 3-4 minutes. You want it to look pale and fluffy. This incorporates air, which helps the cake rise.
3. Add Eggs and Liquids
Add the eggs one at a time, beating well after each. Scrape down the sides of the bowl. Stir in the vanilla and the oil.
4. Create the Red Magic
In a separate measuring cup, whisk the buttermilk, vinegar, and red food coloring together until it’s a bright red liquid.
5. The “Alternating Method”
Turn your mixer to low. Add the flour mixture in three parts and the red buttermilk mixture in two parts, alternating between them. Start with flour, then milk, then flour, then milk, ending with flour. Stop mixing as soon as the flour disappears. Overmixing leads to tough cake!
6. Bake to Perfection
Divide the batter evenly between the two pans. Bake for 30-35 minutes. Stick a toothpick in the center—if it comes out clean or with just a few moist crumbs, it’s done.
7. Cool and Frost
Let the cakes cool in the pans for 10 minutes, then transfer to a wire rack to cool completely. If you frost a warm cake, your icing will melt into a puddle! Once cool, slather generously with that tangy cream cheese frosting.
Top Tips for the Best Red Velvet Cake
- Room Temp is Key: Ensure your butter, eggs, and buttermilk are all at room temperature before you start. This creates a smooth emulsion that traps air better.
- Don’t Skimp on the Vinegar: It sounds weird to put vinegar in a cake, but you cannot taste it! It is essential for the texture and color.
- Gel vs. Liquid Dye: I recommend gel paste if you want a really intense red without adding too much extra liquid.
Nutritional Information (Estimate)
- Calories: ~450 per slice
- Carbs: 65g
- Fat: 22g
- Protein: 5g
Disclaimer: I am an enthusiastic baker, not a nutritionist. Values act as a guideline only.
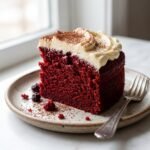
Red Velvet Cake
- Total Time: 55 minutes
- Yield: 12 Slices 1x
- Diet: Vegetarian
Description
A showstopping homemade red velvet cake with a buttery, moist crumb and tangy cream cheese frosting. The perfect balance of mild cocoa, vanilla, and buttermilk.
Ingredients
For the Cake:
- 2 ½ cups (300g) All-Purpose Flour
- 2 tbsp Unsweetened Natural Cocoa Powder
- 1 tsp Baking Soda
- 1 tsp Salt
- ½ cup (113g) Unsalted Butter, room temperature
- 1 ½ cups (300g) Granulated Sugar
- ¼ cup Vegetable Oil
- 2 Large Eggs, room temperature
- 2 tsp Pure Vanilla Extract
- 1 cup (240ml) Buttermilk
- 1 tbsp Distilled White Vinegar
- 1–2 tbsp Red Food Coloring (Liquid or Gel)
For the Cream Cheese Frosting:
- 16 oz (450g) Cream Cheese, full fat, softened
- ½ cup (113g) Unsalted Butter, softened
- 4 cups Powdered Sugar, sifted
- 1 tsp Vanilla Extract
Instructions
- Preheat oven to 350°F (175°C) and grease two 8-inch cake pans.
- Sift together flour, cocoa powder, baking soda, and salt in a medium bowl.
- In a large bowl or stand mixer, beat the butter and sugar on medium-high speed for 3-4 minutes until pale and fluffy.
- Add eggs one at a time, beating well after each. Stir in vanilla and oil.
- In a separate measuring cup, whisk buttermilk, vinegar, and red food coloring until bright red.
- With the mixer on low, add the flour mixture in three parts and the buttermilk mixture in two parts, alternating between them. Start and end with flour. Mix just until combined.
- Divide batter evenly between prepared pans. Bake for 30-35 minutes or until a toothpick inserted into the center comes out clean.
- Cool in pans for 10 minutes, then transfer to a wire rack to cool completely before frosting.
- Beat softened cream cheese and butter until smooth. Gradually add powdered sugar and vanilla, beating until fluffy.
- Generously frost the cooled cake layers.
Notes
- Ensure butter, eggs, and buttermilk are at room temperature for a smooth batter.
- Do not overmix once the flour is added to keep the cake tender.
- Use gel food coloring for a more intense red without adding extra liquid.
- Cool the cakes completely before frosting, or the icing will melt.
- Prep Time: 20 mins
- Cook Time: 35 mins
- Category: Dessert
- Method: Baking
- Cuisine: American
Nutrition
- Serving Size: 1 Slice
- Calories: 450
- Sugar: 40g
- Sodium: 320mg
- Fat: 22g
- Carbohydrates: 65g
- Fiber: 1g
- Protein: 5g
- Cholesterol: 65mg
Frequently Asked Questions
Can I make this red velvet birthday cake ahead of time?
Absolutely! The cake layers actually taste better the next day as the flavors meld. Wrap the unfrosted layers in plastic wrap and store them in the fridge for up to 2 days, or freeze for up to a month.
Do I have to use food coloring?
No, you can skip it! The cake will be a soft cocoa-brown color, often called a “velvet cake,” but it will taste exactly the same.
Why is my cake dry?
The most common culprit is over-measuring flour. Always spoon your flour into the cup and level it off, rather than scooping directly from the bag (which packs it down).
Did you recreate this masterpiece? I’d love to see your red velvet cake triumphs! Leave a comment below, rate the recipe, and tag me in your photos. Happy Baking!


